Kalakand

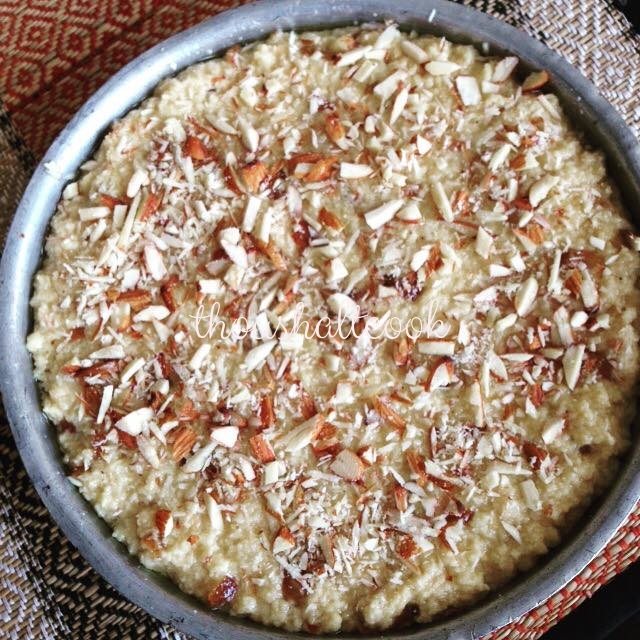
Kalakand has been one of those melt in the mouth sweet dishes that make you feel all warm and fuzzy. I made this one for Janmashtmi and it has been a hit among family and friends.

You shall need: [Time taken- 2.5 hours]

2 L Full cream Milk

3 tbsp lemon juice

60 gms sugar

1.5 tsp cardamom powder

20-25 soaked raisins- chopped

Chopped nuts

muslin cloth

Ghee greased tray/plate

Knife

Method:

  • Boil 1L milk in two bowls.[1L in each bowl]
  • With one we shall make paneer and with the other we need to reduce it to half.
  • The milk to be reduced in half should be on a medium slow heat.
  • To the milk for paneer, add a tsp at a time of lemon juice. We want to be cautious about adding the lemon because we do not want the paneer to be sour.
  • Once the milk solids separate, collect the paneer in muslin cloth and let it sit there for 20 min.
  • Once the milk to be halved has reached the desired level, add the sugar, raisins and cardamom powder.
  • Once the sugar is dissolved, add the paneer, little at a time and stir continuously.
  • Now after this point, you cannot really leave the mixture and loiter.
  • Watch it well and keep stirring it so that the mix does not stick to the bottom and burn.
  • So that we want to do here is remove the moisture as much as possible, we want to left with milk solids with a beautiful colour.
  • Once the liquid is evaporated, pour the contents on the greased plate and shape as desired.
  • Put the nuts on top and cover with a lid and put some weight on it. Any liquid that didn’t escape earlier shall find it’s way out.
  • Cut and serve.

kalakand (1)

Notes:

  1. After adding the raisins, the colour of the kalakand shall change a bit. It will look very pale brown. Don’t get alarmed, this is the desired result.
  2. Your milk vessels must me very clean with no trace of soap.
  3. You may add some saffron to get the yellow tinge.

The entry is for The Urban Spice Sweet September Giveaway.

Cheers,

Pallavi

Sprouts and Barley Flour Pancakes / Bajre ka Pooda

Poodas or savory pancakes are our go to breakfast after long walks. They are easy to put together and very healthy. A Pooda is basically a mix of flours, spices and water. When I was younger, mum used to make these with besan/chick pea flour, onion and green chilly. However I out-lived my love for them and had stopped eating them for good 10 years. Recently my mother in law made the most soft and delicious poodas with wheat flour. Since then there is no looking back, I am hooked with flours like bajra [pearl millet], ragi [finger millet], jowar [white millet], singhada [chestnut].

So here is one of the versions of many that we make now 🙂

You shall need: [Serves 4]

1/2 cup Wheat flour

200 gms steamed and mashed sprouts- I used moong sprouts. Put them in a cooker with 1/4 cup water and it shall becomes soft in 2 whistles. Mash using a spoon or fork.]

1/2 cup Bajra Flour

1/4 cup Rice flour

Salt

2 green chillies- chopped fine

water

Red chilly powder

1/8 cup chopped corriander

Oil

No

Non stick pan

Spatula

Method:

  • Mix the flours, corriander and spices.
  • Add 1.2 cup water and mix, now add the sprouts mash.
  • Add more water and mix.
  • The batter should be of a pouring consistency.
  • Heat a pan, add few drops of oil.
  • Pour a ladleful of the batter on the pan and spread evenly.
  • Cook it well on a medium heat.
  • Once the lower part darkens, flip gently and continue cooking.
  • Repeat the process until the batter is done.

pooda2 (1) pooda1 (1)

Cheers,

Pallavi

2 green

Paneer Methi Paratha – Cottage Cheese Fenugreek Leaves Flatbread

My earliest memories of food have been with Parathas, All sorts, aalu, mooli, gobhi, paneer, missi roti, dal paratha, leftovers paratha… Oh so many.

Most of the lunches at school were parathas too. 🙂 Here is my fav version.

Paneer and Methi 🙂

You shall need: [serves 1]

75 gms crumbled Paneer [put the paneer on a cloth and let the excess water come off]

1/3 cup finely chopped Methi leaves/Fenugreek leaves

Salt to taste

1 tsp coarse Anardana powder

1 tsp lemon juice

Chilly powder to taste

1/2 tsp dhaniya powder

1/2 tsp roasted jeera powder

Paratha dough [wheat flour kneaded with oil, salt and water to a nice and tight consistency. let it rest for 20 min]

Oil

Spatula

Ghee

Dry flour

Rolling board and pin [chakla belan]

Tava [flat griddle]

Method:

  1. In a bowl, mix the paneer, methi, salt, chilly powder, lemon juice, salt and anardana powder.
Processed with VSCOcam with c1 preset
  1. Take a golf size ball of the dough. Roll it using some flour.
  2. Apply some ghee in the center and place half of the paneer mix on it.
Processed with VSCOcam with c1 preset
  1. Wrap it in a parcel and roll it again.
  2. Heat the tava and add few drops of oil on it.
  3. Place the paratha on it and cook it on both sides.
  4. Add little oil as need be.
  5. Be sure to cook the paratha on medium flame.
  6. Serve with love
Processed with VSCOcam with c1 preset

Cheers,

Pallavi

Herb Crusted Paneer [Without bread crumbs]

All these food shows on TV show some version of crusts being used on different ingredients. What has been stopping people to use different things to make the crust – other than Bread crumbs.

To be fair this was not the first thought that came to me :P. I was out of bread crumbs and was too lazy to make fresh one. So I googled “Crust without breadcrumbs”; all the results were telling me was “How to make breadcrumbs”. So I thought lets atleast read a recipe and then decide how to tweak it.

First thought for the base came to me was salted peanuts. Second thought was blanched almonds. Third was rolled oats – coarsely chopped. And I promise the final one was Wheat/oat bran. So I used the bran for this recipe because there was a box that was just lying around :P. I have been using this bran in chapatis and parathas but since husband didnt really like it, I use it only for mine.

Let us get to making this gorgeous paneer. 🙂

You shall need: [ serves 1]

75 gms paneer [2 chunks/slices of the size that you like]

4 tbsp oat bran

3 tbsp chopped fresh herbs [ I used corriander, Basil and mint]

1/2 tsp Salt

1/4 tsp red chilly flakes

1/4 tsp lemon juice

1/4 cup milk

Oil

Shallow non stick pan

Spatula

Two small plates/shallow bowls

Method:

  • Mix the bran, herbs, lemon juice, flakes and salt in one plate.
  • Pour the milk in another plate.
  • Cut the paneer in the slab of the size that you like.
  • Dip the paneer in milk, on both side.
  • Move it to the bran herb mix.
  • Cover it generously and press some mix on it lightly ,as well.
  • Heat the pan on a medium low heat until it is nice and hot.
  • Add few drops of oil. Once it is hot enough, lower the paneer in the pan and let it stand there for a few min. Do not move it to check.

crusted paneer1 (1)

  • Once you can see brown edges, add a few drops of oil on the uncooked side and flip it gently.
  • Press it gently to make sure the crust cooks well on the other side as well.
  • Transfer on serving dish and serve with a lemon.

I ate it with a methi roti and added a tsp of cheese spread on it, turning the paneer and roti into a burrito-ish.

Notes-

  1. Next time I will like to add a few nuts to the bran as well.
  2. In case you do not have fresh herbs, go ahead and use the dried ones- but fresh ones are more preferred. 🙂
  3. Adding more oil is not necessary, trust me. Your pan needs to be good, though.
  4. Adding a few drops of milk on the crust [while adding the crust on top of the paneer] will make sure it sticks well.

crusted paneer2 (2)

Processed with VSCOcam with p5 preset

Cheers,

Pallavi

Pear Salad with Sweet lime/Mausambi Juice dressing

What a party in my mouth this one was ❤ This healthy salad has very less oil and is gorgeous to serve and even travels well [pack the vinaigrette separate]. 🙂

You shall need: [serves 1]

100 gms Salad leaves of your choice [Personally I love a mix but yesterday I had only iceburg] – tear it up

1/4 cup Pomegranate Seeds

1 medium size pear [peel and chopped]

Juice  of 1 Sweet lime/Mausambi

1 tsp Lemon juice

1/4 tsp Red chilly flakes

1/2 tsp Olive oil

1 tsp Fennel seeds

Salt to taste

Method:

  • In a small bottle, add the sweet lime juice, lemon juice, flakes, salt and fennel seeds.
  • Shake it well and  keep in the fridge – This one can stay for upto 3 days in the fridge in an airtight container
  • On a bowl, put the salad leaves, pear and pomegranate. Sprinkle dressing as need be and devour with love.
Processed with VSCOcam with c1 preset

Cheers

Pallavi

Healthy Broken Wheat/Daliya Snack

So you are sitting in the living room and staring at the gorgeous stuff that people that people click with their magical little boxes called camera. While you can sit there and feel about you not having the patience to do the same or you can work your magic in creating something you are proud of you.

I am of the latter kind. While I feel terrible at times for not paying enough attention to these details like presentation and story telling. So is it the ingredient that keeps me going, YES. I am a loyalist when it comes to food habits. I have always been a fan of the broken wheat/bulgur. My healthy eating days are here to stay so I have been giving this gorgeous ingredient a spin of all kinds.

You shall need: [Makes about 20 small balls]

1/2 cup broken wheat

3 cup water

1/4 cup chopped fresh corriander leaves

2 tbsp bajra/jowar/ragi/besan/while wheat flour [I used Bajra Flour]

Salt and red chilly powder

juice of half a lemon

Oil

Peniyaram pan/non stick pan

fork

bowl

Spoon

kitchen towel

Sieve

Method:

  • Wash the broken wheat 2-3 times.
  • Soak it in 1 cup water for 20-30 min.
  • Bring 2 cup water to a simmer and add the broken wheat [minus the soaking water]
  • Reduce the flame to medium and stir using a fork occasionally.
  •  Once it cooks, it will be double in volume and the water will almost be gone. – say 12-15 min or so
  • Put the wheat in a strainer to get rid of extra moisture.
  • Cover the strainer with a tea towel. Stir it with fork a few times till this cools.
  • Move the wheat to a bowl once it is cool to touch.
  • Add the flour, salt, corriander, lemon juice and red chilly powder. Taste to adjust the spice.
  • Heat the pan and add a drop of oil in each slot.
  • Using a spoon, scoop the mix and make tiny balls of it.
  • Put these in the pan and let them brown well on all sides.
  • Once done, serve with love.
Processed with VSCOcam with c1 preset

Cheers,

Pallavi

Instant Ragi and oats Dosa

The frantic rush to fix a breakfast gets to me sometimes. But then missing ingredients also has the same effect. I wanted to eat rava dosa but there was no rice flour 😦

Hence look around and find what all is available, do a quick calculation in the  head and voila breakfast is ready.

So why should we eat ragi? Here are top 5 reasons:

  • Controls Blood sugar
  • Assists in weight loss
  • Relaxes muscles
  • Fights Anemia
  • Great source for Proteins

And why should we eat Oats? Here are top 5 reasons:

  • Enhances Immune response
  • Acts as a natural laxative
  • Reduces risk of cardio vascular disease
  • Controls Blood pressure
  • Lowers Bad cholesterol

You shall need: [Feeds 4]

3/4 cup Ragi Flour

1/3 cup Whole wheat flour

1/3 cup Fine bulgar/daliya

1/2 cup oats – measure first then whiz them in a mixer to make a powder.

1 medium onion chopped finely

2 green chillies finely shopped

2 cup buttermilk [I used about 100 ml of Amul spiced butter milk as well] – mix 4-5 tbsp of curd with 1.5 cups of water

Salt and pepper to taste

Oil

Non stick pan

Whisk

bowl

Spatula

Method:

  • In a bowl, mix all the dry ingredients.
  • Mix using the whisk.
  • Add the onions and green chilly.
  • Pour the butter milk in the mix. We want a runny mix, like that of the rava dosa/crepe.
  • Keep it aside for 5-10 minutes.
  • In case the mix looks thick, add little water to get it to the consistency we want.
  • Heat a non stick pan and put 2-3 drops of oil on it.
  • Pour a ladle-ful of the mix on it. Flatten it well.
  • Flip it using the spatula.
  • Cook well on the other side as well.
  • Serve hot with your favourite chutney.

dosa ragi1

Processed with VSCOcam with m5 preset

Cheers,

Pallavi

Vegetable Stock with Beetroot

Vegetable stocks are super easy to put together. All you need is a little patience, veggies and flavor choice. I always make fresh stocks and not use the shop bought ones or cubes.

The quickest way is to use a pressure cooker and a more elaborate way shall be to make it in an open pot. Whichever way you choose, the most crucial element is to caramelize the vegetables in oil and spice profile of your choice.

Since I was using beets, I used some thyme, garlic,fennel seeds and bay leaf.

Here is all that you will need:

1 tbsp… flavour-less oil

2… small onions – Quartered

250 gms… bottle gourd – chopped

2… Medium size carrots

2… medium size beets- peeled and quartered

100 gms… snake gourd

5-6.. florets of cauliflower

5-6… florets of broccoli

1/2 … green apple

Salt

1 tsp… fennel seeds

1 tsp.. thyme

3 … cloves of garlic or 1 tsp roasted garlic

4.5 cups of water or enough to cover the vegetables and going an inch above them

Equipment:

A heavy base pan

Big Spoon

Muslin cloth and colander

Method:

  • Heat oil in the pan. Add thyme, fennel, bay leaf, onion and garlic.
  • Once they change colour, add carrots, broccoli, cauliflower, gourds, apple and beets.
  • They will try to stick to the pan once they being caramelizing.
  • using the spoon move them often.
  • Add some salt to ensure the moisture escapes.
  • Once you see a nice char add water.
  • Bring it to the boil and reduce the heat to medium low.
  • Let it bubble for 1.5 hours.
  • Strain the stock using the colander and cloth.

The stock can stay up to 10 days in a refrigerator. Fill it in a clean dry jar and use later.

stock1 stock2

Cheers,

Pallavi

Bharwan Baingan/Stuffed Eggplant

I feel Brinjals are one of the most versatile vegetables around. You can stir fry them, roast them, bake them, fry them or even stuff them for that matter. 🙂

Here is a simple yet magical stuffed eggplant recipe that is surely a crowd pleaser.

You shall need: (Feed 2)

10… Small egg plants – I got really tiny ones.

1.5 tsp … oil

1/2 tbsp… Dry coconut powder / shredded dried coconut

1/2 tbsp… Dry coriander powder

1/2 tbsp… roasted jeera powder

1/2 tsp… Amchoor powder

1 tsp… Garam masala powder

Salt and red chilly powder to taste

1 tsp… Jeera and a pinch of hing

few tbsp of water

Method:

  • Wash and make two incisions in the egg plants. Don’t cut them all the way through. We want to be able to see four sectors/segments. Let the stems be on.
  • Mix all the masalas except jeera.
  • Fill this masala in the eggplants and keep ready to be cooked. There will be some masala left over. Keep it aside for use later.
  • Put a nonstick pan with a lid on a medium flame.
  • Let the oil get hot in it and then add Hing and jeera.
  • Carefully lower the stuffed eggplants in the oil.
  • Put about a tbsp or two of water. cover the pan with a lid and let it cook on a slow-medium heat.
  • stir gently and  occasionally
  • keep checking for the water content, we don’t want to stew the eggplant but only want enough water to create steam to cook them.
  • Using a knife, check the done-ness of the eggplant. They should be done in 10 min or so. We want the skin to go wrinkly but not too squishy.
  • Sprinkle the remaining masala on top and stir so that it coats the eggplant well.
  • Turn off the gas and cover with the lid for 5 min or so or until you are ready to serve.
  • Serve with soft fulkas.

stuffed baindan

Cheers,

Pallavi

Linking this to:

 Cooking4allseasons

Extra-Veg-Badge-003  http://fussfreeflavours.com/extra-veg/ &  http://utterlyscrummy.blogspot.co.uk/p/extra-veg.html

Simple and in Season Food Blogging challenge  linking to Ren and fuss free flavors

spice trail badge square The Spice Trail badge 

Sabudana Thalipeeth

The husband and I are fasting for Navratri. I shall be keeping the fast till tomorrow aka saptami while he shall be keeping it will Navmi.

It has been a great opportunity to learn new stuff for the Vrat/fast. I could make sabudana perfectly, made kuttu pooris, aalu kuttu kadhi and dahi wale aalu etc. I saw this recipe on Nishamadhulika.com and wanted to give it a try.

Here is all that you shall need:

1 cup… Sabudana/Sago (Well soaked, drained and dried)

1 cup… Boiled and Mashed potato

1/2 cup… Kuttu/singhade ka aata (Buckwheat/waterchestnut flour)

2-3.. chopped green chillies

1 tsp.. Pepper

Sendha namak to taste (Rock Salt)

Ghee/Oil

A plastic sheet to roll the thalipeeth

A pan/griddle

Method:

  • In a mixing bowl, tip in the potatoes, sabudana, green chillies, flour, salt and pepper and make a soft dough out of it.
  • You shall net need any water to bind this one.
  • Lay the plastic sheet flat on the surface and grease it with ghee/oil.
  • Heat the pan/griddle and put a little oil/ghee on it.
  • Carefully transfer the thalipeeth to the pan.
  • Using a wooden spoon with a round handle, make a hole in the center of the thalipeeth.
  • Put a little oil/ghee in the center and around the surface of the thalipeeth.
  • Cook until one side is nice and brown.
  • Flip it and cook for a few min.
  • Serve it hot with lots of love.

It can be eaten with curd/kadhi/aalu ki subzi etc.

IMG_0002 IMG_0003

Cheers,

Pallavi