Bateta Dungri Poha

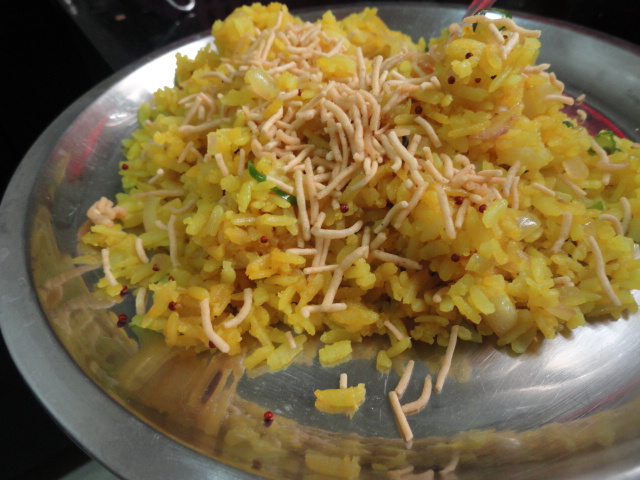
Well North-South-East-West all corners of India love their version of flattened rice aka poha. It is almost a way of life for western India.

I bring to you a Gujarati Version of this beautiful rice form. Dont be scared it uses a lot of oil. The more the oil the more soft and luscious it is.

It is lovely mix of 3 spices, sugar, green chillies, onion, potato and of course Poha.

You shall need: [Feeds 2… one gujju-one non gujju] 😛 Trust me Gujju’s dont compromise with the poha quantity.

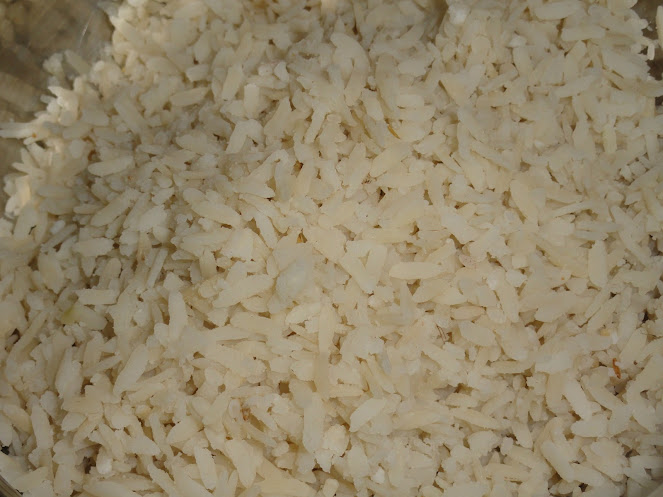
1.5 cup… Flattened rice [There are essentially 3 kinds of Poha available in the market. 1. Thinnest of them all- it is used for chivda/fried snack. 2. Medium size- This is the one Gujju’s use to make poha. 3. Fattest one- This is essentially used in Southern part of India as Avalakki]

5-6 tbsp… Milk

1… Medium Size Onion[Finely chopped]

1…Small potato [Par bolied and chopped in small-is pieces]

2-3.. Green chillies [Finely chopped. We dont add red chilly powder, hence its the green chillies that do the work]

1/2 Tsp… Turmeric Powder

1.5 Tbsp… Sugar

Salt to taste

1/2 Tsp… Mustard Seeds/Rai

Juice of 1 lemon

8-10 Tbsp… Oil

3-4 Tbsp… Coriander leaves chopped [Optional]

Bhujia Sev [To serve -optional]

Method:

  • Put the poha in a sieve and get rid of the poha dust.
  • Wash it thoroughly.
  • Add just about enough water so that the poha is all drenched. Make sure there is no excess water.
  • Use a fork to stir the poha occasionally.
  • Add milk after first 15 min of soaking is over.
  • Now after about 10 min, take on morsel of the poha and press it between your thumb and index finger. It should flatter further but not be pasty. If it is pasty, you added way too much water for the first 15 min. If it is still firm, add a few more tbsp of water and keep for 10 min.

  • In a wok, heat about 5 tbsp oil.
  • Add the rai and let it splutter.
  • Add the onion, green chilly and a little salt to let it sweat.
  • After onions are translucent, add the potato.
  • Cover with a lid and cook on a medium heat for about 5-7 min.
  • In the mean time, mix the turmeric in the poha. Set aside.
  • Once the potato is done, add the poha.
  • Mix the contents of the wok evenly.
  • Add about 3-4 tbsp of oil to the poha.
  • It shall mix really easily now.
  • Cover and cook on medium heat for 5 min.
  • The poha should be fluffy and of a nice summer-ish yellow color.
  • Adjust the salt.
  • Add the sugar and mix it well.
  • Turn off the gas and add the lemon juice.
  • Add the coriander and serve with Bhujia.

On tasting it, you must get the hit of the green chilly, sweetness and also sourness. That my lovely people is the world famous in India Gujarati Poha. 🙂

Fun Fair event Announcement and Giveaway

Thanks guys for the lovely response.

I got in all 35 recipes in less than a month. But we still  have 30 days to go 🙂

Who knows I might add something else also to the give away. 😉

Keep linking, keep cooking and keep sharing.

The link for the original announcement is here.

Lets get more creative with food that can be easily handled on a fun fair stand.

Eg: cup cakes, chaats, finger food etc.

Cheers!

Lasagna Rolls

This was my first attempt at handling the rectangle pasta sheet. To my surprise, it is a hit in the friends and family circle.

Here is what you shall need: [Feeds 4]

For the sheets-

8-10… Lasagna Sheets

Water to boil them

1 Tbsp… Oil

For the Filling-

1 can… Baked Beans

1 bunch… Spinach

1/2 cup… Corn

1 cup… Peppers of your choice [Diced]

1 Tsp… Paprika

1… Small onion [ chopped]

2 Tbsp.. Olive oil

Salt

1  Tsp.. Pepper

1 Tsp… Chilly Flakes

1 Tbsp.. Oregano

4 Tbsp… Cheddar cheese

For the sauce-

One batch of the Basic Italian Tomato Sauce

This one needs to be slightly thin than the one  we use in Pastas. It should be of a pouring capacity, not one where blobs form when one tries to ladle it.

To assemble:

Oven safe ceremic/bakeware.

2 cup… Mozzarella cheese [grated]

Method:

  • For the filling:
    • Heat oil in a pan.
    • Add the onion, let it sweat.
    • Add the baked beans and peppers.
    • Let it cook on medium heat with lid on for 10 min. Stir occasionally.
    • Add the seasonings and spinach.
    • Cover and let the spinach cook for further 3 min.
    • Turn off the gas and add the cheese.
    • The residual heat shall melt the cheese.
    • Let it cool completely till further use.

  • For the Lasagna-
    • Boil water in a pan that can fit the sheets straight.
    • Add oil and the sheets.
    • Boil for roughly 10 min. Check if they are Al-dente.
    • Remove and place separately on trays.

  • To Assemble-
    • In the baking tray, put a layer of the sauce.

    • On a flat surface, put the lasagna sheet and add the filling lengthwise in the middle.

    • Roll is carefully.

    • Place the seam-side down in the baking tray.

    • Repeat the process for all the sheets.
    • Cover the rolled lasagna with some more sauce.

    • Add the cheese and top.

    • Bake in a pre heated 180C oven for 20 min.
    • Serve with love.

Apologies for not being able to take pic of this after it was baked 😦 my guests were too impatient to wait for a pic 🙂

This goes to:

Around the world Italian at Pinch of Salt

Favorite recipe- pasta or noodle at Zesty South Indian Kitchen

A Home maker’s Dairy- Monsoon of India

Bon Vivant

Bake Fest at Foodomania, a brain child of vardhini

I love baking #7

Eggless Chocolate Pudding

Ever craved for a light yet scrumptious dessert after a meal? Here is the answer to the prayers 😀

You shall need: [Makes 8 small cups]

For the Pudding-

1-3/4 cup… Milk [I used full milk]

3 Tbsp… Cocoa Powder

3 Tbsp… Sugar

2 tbsp… Custard Powder

1 Tsp… Vanilla Essence

3 Tbsp… Semi Sweet chocolate [Chopped]

1/3 cup… Chopped walnuts

For the Topping-

1 cup.. Chopped Semi-sweet and milk chocolate [chopped]

1/3 cup.. Cream

3 Tbsp… Melted Butter

4-5.. Dried apricots, cut in slices.

Method:

  • Take 1/3 cup milk and add the cocoa and custard powder to it. Make a paste.
  • Heat the remaining milk, add the vanilla and sugar to it.
  • Keep the flame slow.
  • Once tiny bubbles appear on the edges of the container, add the cocoa and custard powder mix.
  • Mix until it thickens up.
  • Remove from fire.
  • Pour in the containers and top with chopped walnuts.
  • In a microwave safe bowl, melt the chocolate for 30 sec.
  • Stir immediately and do not over cook the chocolate.
  • Add the butter and cream.
  • Hear for 10-10 sec [2 times] stirring after each 10 sec.
  • Once it is mixed well, pout a spoonful on the already prepared pudding cups.
  • Decorate with dried apricot slices.
  • Chill in the fridge for atleast 2 hours before serving.

Cheers

This goes to:

Cook.Eat.Delicious-Desserts

Kids delight: Chocolate event at Ribbon’s to Pasta’s  brain child of Srivalli

Review: Maggi Juicy Specialz- kadhai paneer

Remember that Rahul Khanna and Amrita Puri Advert for the Maggi Juicy Specialz? Here it is.

I did try it out and was not disappointed. In fact the masala is something else. Loved it.

It comes with a gravy pouch, a plastic bag and a band to seal the bag. Priced: INR 50. Well worth it.

All you need is 200 gms paneer, 100 ml water and some chopped capsicum.

The instructions tell me to stash the gravy paste from the pouch, capsicum and paneer in the bag and add the water.
Seal the bag and let it be in the microwave for about 5 min.

Pros:

  • Smells brillaint
  • Very easy to make
  • Tastes great
  • Makes a lovely accompaniant

Cons:

  • Cooking in the plastic bag made me a little uncomfortable.
  • The instructions did not tell me at what % of heat do I need to cook it. [Onida microwaves work on heat % ]
  • The capsicum was under done for my taste. I had to cook it for further 4 min after pulling it out of the bag.

Will I try it again: Not in the bag but the masala is definitely to die for.

Things to remember:

  • Always mix the paste with the 100ml water in a bowl before adding to the bag.
  • The bag might look flimsy but holds well.
  • You might tend to drop the bag sealing thingie because it is really tiny but it is one of the most important things.
  • Seal the bag tightly however away from the contents. As far as possible so that the steam created in the bag cooks the paneer.
  • If you are using frozen paneer, thaw it well. 5 min with the curry wont even help the paneer a little.
  • Dont keep the capsicum chunky, it shall not cook well.
  • You might be tempted to add more water but trust me it does not need more than the specified amount.

Tada

The paneer was cooked beautifully and tasted very well.

Moong Dal Khichdi

Khichdi is the comfort food’s Queen.  Serve it with Ghee/ papad/ raita/ plain curd/ pickle/ kachumbar salad/ even a light curry, it shall never fail to impress you.

DH’s family loves the non coagulated state of the khichdi. They need to see each grain apart.

I usually use most of the dals to make khichdi, this time I used Moong Dal with Chilka.

You shall need: [Feeds 2]

2 tea cup… Rice

1 Tea cup… Moong dal [chilka]

Water to soak the lentils

Salt

2 Tbsp… Ghee

1 Tbsp…. Sambhaar powder [This is nothing but the achaar masaala that I got from Gujarat]– Add Red chilly powder if this is not available [to taste]

1/2 tsp… Turmeric

A pinch of Asafoteda/hing

1/2 tsp… Jeera

2… dried red chillies

Method:

  • After washing well, soak the rice and dal in water for about 30-40 min.
  • Remove the water and keep aside
  • In a cooker, heat the ghee, add the hing, jeera and dried red chilly.
  • Add salt, turmeric and sambhaar/red chilly powder.
  • Add the Dal and rice and stir.
  • Now add water just enough to cover the dal and rice. Add about 1/2 tea cup more. The water should not be more than 1/2 an inch above the sal and rice level in the cooker.
  • Let it come to a simmer, close the lid and let it cook for 3 whistles.
  • Turn off the gas and let the steam escape on it own.
  • To serve, add ghee to it. Tastes best with pickles, curd, papad and salad.

Cheers

Of the most weird weekend ever

The weekend that ended on 26-Aug-2012 shall always be remembered both dearly and teary-eyed.

Where on one had we met long time friends after years, on the other hand we lost a very dear friend.

N and M is the former couple and P is the latter friend.

N and M are based out of Dubai and were here to meet us after almost a year of their marriage. We sang, talked, cooked and discussed a lot of things. However his almost 30 hour trip to Bangalore shall be remembered always.

However P was on ventilator for almost 3 days now, around 11 am on 26th we got the call we were dreading. P had given up the struggle to survive and was united with her dad. She is survived by a 32 year old husband and a 4 month Old daughter. Life is pretty unfair at times. We cant always plan enough, talk enough or meet enough. However what causes heart breaks is realizing that you shall never meet, hear or see this person again.

May her soul rest in peace. We love you P. ❤

Eggless Savoury Muffins and Sin-a-mon

Sin-a-mon‘s Monica Manchanda is a darling. She invited me with another girlfriend to her baking paradise aka her home. She made us some realllyyy beautiful Zucchini and Smoked cheese Savory Muffins. We did hog on them.

In fact I own a lot to her as she introduced me to Baking. Her classes are to die for. She is interactive, lively and very knowledgeable.

I adapted her I-dont-know-what-ingredients-go-in-this recipe to an eggless version and they were indeed a knock out.

Love you Mon ❤

You shall need: [Makes 6]

1 Cup… All Purpose Flour

1/2 Tsp… Baking Powder

1/4 tsp… Baking Soda

1 Tsp… Salt

1 Tsp…. White Pepper

1/2 tbsp… Oregano

1/2 tsp..Paprika [Gives a lovely pink tinge]

1/2 Cup… Milk

1/3 cup…Olive oil

1/2 … Red bell- pepper dices [Take any bell pepper of your choice]

1/4 cup…. Mozzarella cheese [Grated]

1/4 cup… Cheddar cheese [grated]

4-5… Jalapeno pepper slices [almost minced]- Optional

Photo

Method:

  • Put all the dry together in a separate bowl. And whisk
  • Put all the wet together and whisk.
  • Add the Red pepper, jalapenos and cheese to the wet.
  • Add the wet to the dry.
  • Whisk until combined, dont over whisk.

  • Pour in cupcake liners upto 3/4 full

  • Bake in a 180C pre heated oven for 15-17 min. Or until the skewer comes out clean.

  • Let them cool for a few min.

  • Serve with Soup or devour them all by themselves.

Cheers

Photography idea and credits: Sin-a-mon and @feisty_ta. Thanks Ladies. You are the best :* :*

THis goes to:

Lets cook Starters at Tickling Palates

Let's Cook

Bon Vivant

Bake Fest at Foodomania, a brain child of vardhini

I love baking #7

A Home maker’s Dairy- Monsoon of India

My Culinary Creations

Tomato and Carrot Clear Soup

Ever got stuck in a situation where all you have in the kitchen is a little of this vegetable and a little of that? Happens more than often with me.

If one weekend goes by without subzi shopping, I am stranded with left overs, lentils and random vegetables.

Anyway, pati loves clear soup and I tolerate it somehow 🙂 [I am a thick soup fan]

I read about the clear tomato recipe some where sometime back and it stuck with me. The broth looked beautiful and I was sure it shall be divine as well. To be very frank I was not disappointed at all.

All this soup needed was 6 things:

4…Medium Size Tomatoes [chopped]

2… Carrots [Peeled and diced]

1 Tbsp… Butter

Salt

Pepper

1/2 tsp… Sugar

Method:

  • In a pan, add the butter and pan fry carrots a bit.
  • Add about 5 cups of water.
  • Let it come to a boil, add the tomatoes.

Photo

  • Cover with a lid and cook on a slow heat for 15 min.
  • Remove the lid after 15 min.
  • Add sugar, salt and pepper.
  • Pass the contents through a muslin cloth.
  • Squeeze all the goodness out of the veggies.

Photo

  • You shall be left with glistening orange goodness.
  • Taste and adjust the seasoning.

Serve hot with bread of your choice.
I served it with a Savory muffin.

Photo

Cheers

THis goes to:

Lets cook Starters at Tickling Palates

Let's Cook

A Home maker’s Dairy- Monsoon of India